ROSインストールの備忘録
2018.12.31 永井 忠一
用意した物
Raspberry Pi 3 Model BとmicroSDカード(容量は適当なものを。複数枚あると便利)。
Ubuntu 16.04のインストール
こちら からイメージを取得。ubuntu-16.04-preinstalled-server-armhf+raspi3.img.xzを使用。
イメージをmicroSDカードへddする。PCにインストールしているLinuxを使用。私の環境では、microSDカードのデバイスファイル名はsdb。
$ ls /dev/sdb*
/dev/sdb  /dev/sdb1
$ xzcat ubuntu-16.04-preinstalled-server-armhf+raspi3.img.xz | sudo dd of=/dev/sdb
そのmicroSDカードからRaspberry Piを起動。DHCP環境のあるインターネットに接続可能なネットワークにEthernetで接続し、USBキーボード、HDMIモニターを接続する。
もしくはsshでログイン。IPアドレスはルーターの機能で同じIPアドレスが割り振られるようにするのが便利。
ユーザー名ubuntu、初期パスワードubuntuでログインする。ログインすると新しいパスワードを設定するように言われるので従う。
WARNING: Your password has expired.
You must change your password now and login again!
Changing password for ubuntu.
(current) UNIX password:
ログインしたらまずはこれ(↓)。
$ sudo apt update
$ sudo apt upgrade
《しばらく時間が掛かる…》
Ubuntuの環境設定
キーボードレイアウトの変更。(日本語キーボードを使っている場合)
$ sudo dpkg-reconfigure keyboard-configuration
メニューから「Generic 105-key (Intl) PC → Japanese → Japanese → The default for the keyboard layout → No compose key」を選択する。
タイムゾーンの設定。
$ sudo dpkg-reconfigure tzdata
メニューから「Asia → Tokyo」を選択。
ホスト名の変更。(お好みで)
$ sudo hostnamectl set-hostname raspi
(必要なら)syslogを書き出すようにする。
設定ファイル/etc/rsyslog.d/50-default.confの以下の行のコメントアウトを外して、rsyslogを再起動する。
#*.=info;*.=notice;*.=warn;\
#       auth,authpriv.none;\
#       cron,daemon.none;\
#       mail,news.none          -/var/log/messages
これで/var/log/messagesにsyslogが書き出されるようになる。
(Work-around)
何故か、自分のホスト名が名前解決できなかったので、/etc/hostsに以下の行を追加。
ROS Kinetic Kameのインストール
公式にあるインストール手順 のとおり。
$ sudo sh -c 'echo "deb http://packages.ros.org/ros/ubuntu $(lsb_release -sc) main" > /etc/apt/sources.list.d/ros-latest.list'
$ sudo apt-key adv --keyserver hkp://ha.pool.sks-keyservers.net:80 --recv-key 421C365BD9FF1F717815A3895523BAEEB01FA116
$ sudo apt-get update
$ sudo apt-get install ros-kinetic-desktop-full
《しばらく時間が掛かる…》続けて
$ sudo rosdep init
$ rosdep update
$ echo "source /opt/ros/kinetic/setup.bash" >> ~/.bashrc
$ source ~/.bashrc
$ sudo apt install python-rosinstall python-rosinstall-generator python-wstool build-essential
(※rosdep updateに間違ってsudoを付けない。作成されるファイルがrootの持ち物になってしまう。)
インストールの確認
まずroscoreを起動。
$ roscore
... logging to /home/ubuntu/.ros/log/94340eb4-0cb9-11e9-938d-b827eb8cdd55/roslaunch-raspi-1418.log
Checking log directory for disk usage. This may take awhile.
Press Ctrl-C to interrupt
Done checking log file disk usage. Usage is <1GB.

started roslaunch server http://raspi:35735/
ros_comm version 1.12.14


SUMMARY
========

PARAMETERS
* /rosdistro: kinetic
* /rosversion: 1.12.14

NODES

auto-starting new master
process[master]: started with pid [1433]
ROS_MASTER_URI=http://raspi:11311/

setting /run_id to 94340eb4-0cb9-11e9-938d-b827eb8cdd55
process[rosout-1]: started with pid [1446]
started core service [/rosout]
その状態で、別の端末などから、以下のようなrosのコマンドが動けばインストールは成功。
$ rosnode list
/rosout
$ rostopic list
/rosout
/rosout_agg
catkin_ws(ワークスペース)の作成
作業用ディレクトリをcatkin_wsとする。以下のコマンドでワークスペースの作成と初期化を行う。
$ mkdir -p ~/catkin_ws/src
$ cd ~/catkin_ws/src
$ catkin_init_workspace
$ cd ..
$ catkin_make
.bashrcに以下の行を追加して
source ~/catkin_ws/devel/setup.bash
設定を反映させる。
デモプログラムの実行
mjpeg_serverを動かしてみる。適当なUVCカメラ(USBカメラ)を用意して繋ぐ。
必要なパッケージをインストール。
$ sudo apt install ros-kinetic-cv-camera
$ cd ~/catkin_ws/src/
$ git clone https://github.com/RobotWebTools/mjpeg_server.git
$ cd ..
$ catkin_make
起動。
$ roscore &
$ rosrun cv_camera cv_camera_node &
$ rosrun mjpeg_server mjpeg_server
(こんな(↓)警告が出てしまいますが、こちらを使わせていただきました。)
[ WARN] [1546237353.229911199]: WARNING -- mjpeg_server IS NOW DEPRECATED.
[ WARN] [1546237353.230373077]: PLEASE SEE https://github.com/RobotWebTools/web_video_server.
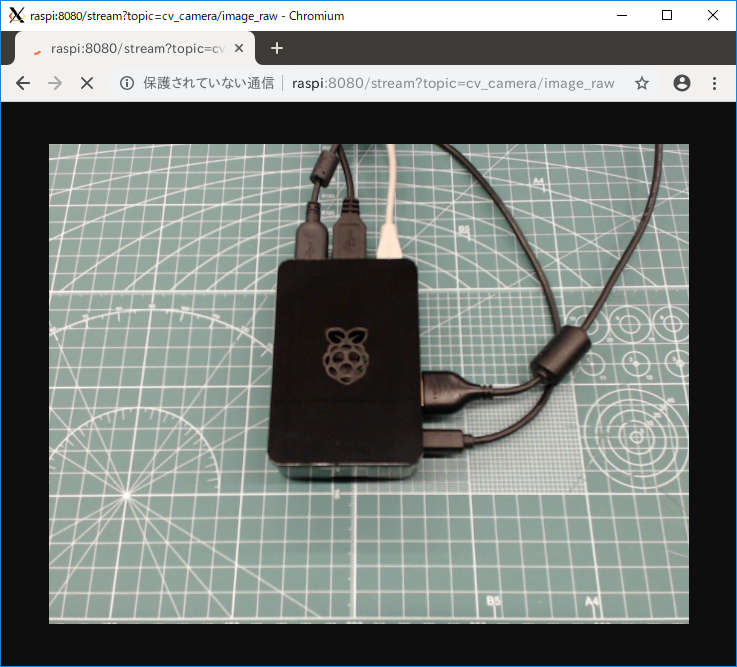
ブラウザでhttp://《IPアドレス》:8080/stream?topic=cv_camera/image_rawにアクセス。
以下、実行画面。(実際は動画で)
参考文献
はじめてのROSプログラミング
2019.1.6 永井 忠一
作業用ワークスペースの確認
上記で作成したワークスペースを使用。環境変数ROS_PACKAGE_PATHを確認。
$ echo $ROS_PACKAGE_PATH
/home/ubuntu/catkin_ws/src:/opt/ros/kinetic/share
パッケージを作成
以下のコマンドで、プログラムの置き場所を作る。パッケージ名はmyfirstpkg。
$ cd ~/catkin_ws/src
$ catkin_create_pkg myfirstpkg rospy
Created file myfirstpkg/CMakeLists.txt
Created file myfirstpkg/package.xml
Created folder myfirstpkg/src
Successfully created files in /home/ubuntu/catkin_ws/src/myfirstpkg. Please adjust the values in package.xml.
$ cd myfirstpkg/
$ mkdir scripts
$ cd scripts/
catkin_create_pkgコマンドを使用。rospyは、Python用の言語バインディング。
scriptsディレクトリを作成。Pythonのスクリプト置き場。
ひとつめのノードはcount.py
カウンタをカウントアップしてPublishする。周期は1000Hzに指定。
#!/usr/bin/env python

import rospy
from std_msgs.msg import Int32

if __name__ == '__main__':
    rospy.init_node('count')
    pub = rospy.Publisher('count_up', Int32, queue_size = 1)
    rate = rospy.Rate(1000) # Hz
    n = 0
    while not rospy.is_shutdown():
        n += 1
        pub.publish(n)
        rate.sleep()
ふたつめのノードはdiff.py
カウンタをSubscribeする。前回のカウンタを覚えておいて、差分を計算する。取りこぼしたメッセージ数をカウントして、それをPublish。
#!/usr/bin/env python

import rospy
from std_msgs.msg import Int32

has = False
last = 0
lost_count = 0

def cb(message):
    global has, last, lost_count
    if has == False:
        has = True
    else:
        delta = (message.data - last)
        if delta > 1:
            lost_count += (delta - 1)
            # rospy.loginfo('drop message! = ' + str(lost_count))
    last = message.data

if __name__ == '__main__':
    rospy.init_node('diff')
    sub = rospy.Subscriber('count_up', Int32, cb)
    pub = rospy.Publisher('lost_count', Int32, queue_size = 1)
    rate = rospy.Rate(1) # Hz
    while not rospy.is_shutdown():
        pub.publish(lost_count)
        rate.sleep()
みっつめのノードはcheck.py
取りこぼしカウンタをSubscribe。カウンタの値が増えたらログに表示。
#!/usr/bin/env python

import rospy
from std_msgs.msg import Int32

lost_count = 0

def cb(message):
    global lost_count
    if lost_count != message.data:
        rospy.loginfo('lost count = ' + str(message.data))
    lost_ccount = message.data

if __name__ == '__main__':
    rospy.init_node('check')
    sub = rospy.Subscriber('lost_count', Int32, cb)
    rospy.spin()
プログラム実行
まずはroscoreを起動。roscoreが起動している状態で各ノードを動かす。
rosrunユーティリティを利用。パッケージ名、プログラム名からプログラムを検索して実行してくれるスクリプト。便利。
$ file `which rosrun`
/opt/ros/kinetic/bin/rosrun: Bourne-Again shell script, ASCII text executable
(プログラムを直接起動してもよい。)
(roscdなど、同様に便利なコマンドが用意されている。使い方は、コマンド名から想像できる。)
それぞれのノードを起動。(※起動する前に、Pythonのスクリプトファイルに実行権を立てておくことを忘れない。「scripts$ chmod +x *.py」)
$ rosrun myfirstpkg count.py
$ rosrun myfirstpkg diff.py
$ rosrun myfirstpkg check.py
(Publisher/Subscriberモデルで)メッセージだけを使用している場合、それぞれのノードは疎結合。起動の順序などはなく、特定のノードだけを立ち上げ直すことも可能。柔軟。
メッセージのデータ型は、今回はすべてInt32。
ROSが提供するコマンドを使って確認することができる。
$ rostopic list
/count_up
/lost_count
/rosout
/rosout_agg
$ rostopic type /lost_count
std_msgs/Int32
$ rostopic echo /lost_count
data: 216
---
data: 216
---
data: 219
---
私の環境では、1000Hzでは動ききれず、ぱらぱらとメッセージを取りこぼしていることが観測できる。
$ rosrun myfirstpkg check.py
《...snip...》
[INFO] [1546740222.376612]: lost count = 2427
[INFO] [1546740223.376522]: lost count = 2429
[INFO] [1546740224.376964]: lost count = 2433
《...snip...》
roslaunchファイルによる起動
複数のノードを毎回手で起動するのは面倒なので、必要なものを一気に起動してくれる便利な仕掛け。
こんな(↓)ふうに記述。XMLファイル。
$ cat launch/my.launch
<launch>
  <node pkg="myfirstpkg" name="count" type="count.py" required="true" />
  <node pkg="myfirstpkg" name="diff" type="diff.py" required="true" />
  <node pkg="myfirstpkg" name="check" type="check.py" required="true" />
</launch>
コマンドひとつで必要なものすべてを起動してくれる。
$ roslaunch myfirstpkg my.launch
標準出力にログが表示されないので、別の端末から、以下で確認。
全体構成の確認
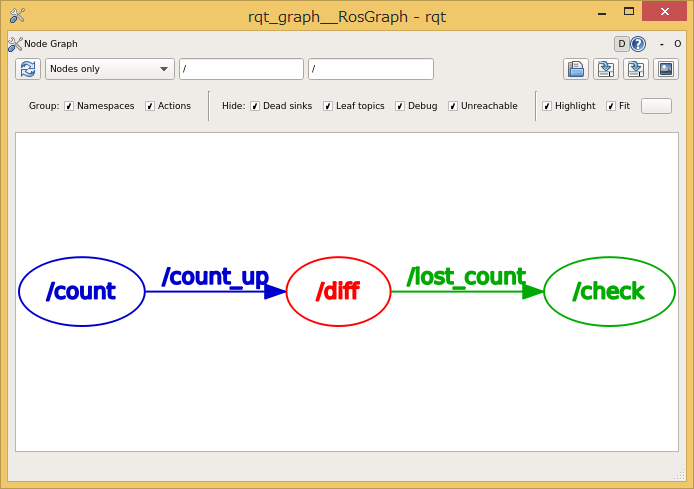
以下のコマンドでGUI表示。
$ rosrun rqt_graph rqt_graph
こんな(↓)感じのグラフで表示される。
参考文献
ROSプログラミングC/C++
2019.1.12 永井 忠一
パッケージの作成
catkin_create_pkgコマンドを使用。パッケージ名はmysecondpkg。
$ cd ~/catkin_ws/src
$ catkin_create_pkg mysecondpkg roscpp rospy std_msgs
Created file mysecondpkg/package.xml
Created file mysecondpkg/CMakeLists.txt
Created folder mysecondpkg/include/mysecondpkg
Created folder mysecondpkg/src
Successfully created files in /home/ubuntu/catkin_ws/src/mysecondpkg. Please adjust the values in package.xml.
パッケージ名mysecondpkgの後に続くコマンドオプションroscpp rospy std_msgsは依存する(使用する)パッケージ。
roscppはC/C++の言語バインディング。std_msgsには、以下の型が用意されている。
$ ls /opt/ros/kinetic/include/std_msgs
Bool.h               Int64.h                builtin_bool.h
Byte.h               Int64MultiArray.h      builtin_double.h
ByteMultiArray.h     Int8.h                 builtin_float.h
Char.h               Int8MultiArray.h       builtin_int16.h
ColorRGBA.h          MultiArrayDimension.h  builtin_int32.h
Duration.h           MultiArrayLayout.h     builtin_int64.h
Empty.h              String.h               builtin_int8.h
Float32.h            Time.h                 builtin_string.h
Float32MultiArray.h  UInt16.h               builtin_uint16.h
Float64.h            UInt16MultiArray.h     builtin_uint32.h
Float64MultiArray.h  UInt32.h               builtin_uint64.h
Header.h             UInt32MultiArray.h     builtin_uint8.h
Int16.h              UInt64.h               header_deprecated_def.h
Int16MultiArray.h    UInt64MultiArray.h     trait_macros.h
Int32.h              UInt8.h
Int32MultiArray.h    UInt8MultiArray.h
ノードの作成
C/C++のソースコードの置き場所。
$ touch mysecondpkg/src/count.cpp
$ touch mysecondpkg/src/diff.cpp
countノード。1000HzでカウンタをインクリメントしてPublishする。
(C/C++とPythonのプログラムを比較しながら。)
C/C++
Python
#include <ros/ros.h>
#include <std_msgs/Int32.h>

int main(int argc, char *argv[])
{
        ros::init(argc, argv, "count_cpp");
        ros::NodeHandle hNode;
        ros::Publisher pub = hNode.advertise<std_msgs::Int32>("countup_cpp", 1/* queue_size */);
        ros::Rate rate(1000); // Hz
        std_msgs::Int32 cnt;
        cnt.data = 0;
        while (ros::ok()) { // main loop
                pub.publish(cnt);
                cnt.data++;
                rate.sleep();
        }
        return 0;
}
#!/usr/bin/env python

import rospy
from std_msgs.msg import Int32

if __name__ == '__main__':
    rospy.init_node('count_py');
    pub = rospy.Publisher('countup_py', Int32, queue_size=1)
    rate = rospy.Rate(1000) # Hz
    cnt = 0
    while not rospy.is_shutdown():
        pub.publish(cnt)
        cnt += 1
        rate.sleep()
checkノード。カウンタをsubscribeして、取りこぼしたメッセージ数を数えてlogに表示。
#include <ros/ros.h>
#include <std_msgs/Int32.h>
#include <stdint.h>

static int32_t g_count;
static bool g_has_last;
static int32_t g_last;
static int32_t g_lost;

static void callback(const std_msgs::Int32 &message) {
        if (g_has_last) g_lost += (message.data - g_last - 1);
        g_last = message.data;
        g_has_last = true;
        if ((g_last / 1000) > g_count) {
                ROS_INFO("lost = %d", g_lost);
                g_count = (g_last / 1000) + 1;
                g_lost = 0;
        }
}

int main(int argc, char *argv[])
{
        ros::init(argc, argv, "check_cpp");
        ros::NodeHandle hNode;
        ros::Subscriber sub = hNode.subscribe("countup_cpp", 1/* queue_size */, callback);
        ros::spin();
        return 0;
}
#!/usr/bin/env python

import rospy
from std_msgs.msg import Int32

count = 0
has_last = False
last = 0
lost = 0

def callback(message):
    global count, has_last, last, lost
    if has_last:
        lost += (message.data - last - 1)
    last = message.data
    has_last = True
    if (last / 1000) > count:
        rospy.loginfo('lost = ' + str(lost))
        count = (last / 1000) + 1
        lost = 0

if __name__ == '__main__':
    rospy.init_node('check_py')
    sub = rospy.Subscriber('countup_py', Int32, callback)
    rospy.spin()
CMakeLists.txtの編集とcatkin_makeの実行(ビルド)
以下のようにCMakeLists.txtに追加。
$ cd ~/catkin_ws/src/mysecondpkg/
$ cat CMakeLists.txt

《...snip...》

## Declare a C++ executable
## With catkin_make all packages are built within a single CMake context
## The recommended prefix ensures that target names across packages don't collide
# add_executable(${PROJECT_NAME}_node src/mysecondpkg_node.cpp)
add_executable(count src/count.cpp)
add_executable(check src/check.cpp)

《...snip...》

## Specify libraries to link a library or executable target against
# target_link_libraries(${PROJECT_NAME}_node
#   ${catkin_LIBRARIES}
# )
target_link_libraries(count ${catkin_LIBRARIES})
target_link_libraries(check ${catkin_LIBRARIES})
ワークスペースからビルド。
$ cd ~/catkin_ws/
$ catkin_make
実行イメージのできる場所。
$ find . \( -name count -or -name check \) -print
./devel/lib/mysecondpkg/check
./devel/lib/mysecondpkg/count
(プログラムの実行方法は同様。)
$ roscore
$ rosrun mysecondpkg count & rosrun mysecondpkg check # C/C++
$ rosrun mysecondpkg count.py & rosrun mysecondpkg check.py # Python
ゲームコントローラーからの入力
2019.1.13 永井 忠一
準備
適当なゲームコントローラーを用意して、USBで接続。
以下のようにデバイスファイルが見えれば、OS(Linux)がデバイスを認識できている。(だめな場合はdmesgコマンドなどでエラーが出ていないか確認。)
$ ls /dev/input/js*
/dev/input/js0
ROSのJoystickドライバーのインストール。
$ sudo apt install ros-kinetic-joystick-drivers
joy_nodeを実行。
$ roscore
$ rosrun joy joy_node
[ INFO] [1547337558.193587769]: Opened joystick: /dev/input/js0. deadzone_: 0.050000.
これで/joyトピックが配信(Publish)される。
$ rostopic list
/diagnostics
/joy
/rosout
/rosout_agg
$ rostopic echo /joy
header:
  seq: 1
  stamp:
    secs: 1547337836
    nsecs: 397167345
  frame_id: ''
axes: [0.0, 0.0, 0.0, 0.0, 0.0, 0.0, 0.0, 0.0]
buttons: [1, 0, 0, 0, 0, 0, 0, 0, 0, 0, 0]
---
header:
  seq: 2
  stamp:
    secs: 1547337838
    nsecs: 656612490
  frame_id: ''
axes: [0.0, 0.0, 0.0, 0.0, 0.0, 0.0, 0.0, 0.0]
buttons: [0, 0, 0, 0, 0, 0, 0, 0, 0, 0, 0]
---
(ボタンを一度押したときの例。)
入力をプログラムから取得
たとえばこのように。
#!/usr/bin/env python

import rospy
from sensor_msgs.msg import Joy

def callback(msg):
    rospy.loginfo('input(' + str(msg.header.seq) + '):')
    rospy.loginfo('* axes = ' + ' '.join(map(str, msg.axes)))
    rospy.loginfo('* buttons = ' + ' '.join(map(str, msg.buttons)))

if __name__ == '__main__':
    rospy.init_node('controller')
    sub = rospy.Subscriber('joy', Joy, callback, queue_size=1)
    rospy.spin()
ROSタイマー 2019.1.19 永井 忠一
1000Hzで動けているか確認
上記checkノードをROSタイマー使うように変更。1秒間に受信できたメッセージ数をカウントする機能を追加。
C/C++
Python
#include <ros/ros.h>
#include <std_msgs/Int32.h>
#include <stdint.h>

static int32_t g_count;
static bool g_has_last;
static int32_t g_last;
static int32_t g_lost;

static void callback(const std_msgs::Int32 &message) {
        if (g_has_last) g_lost += (message.data - g_last - 1);
        g_last = message.data;
        g_has_last = true;
        g_count++;
}

static void timer_callback(const ros::TimerEvent &) {
        ROS_INFO("timer callback fiered.");
        ROS_INFO("* count = %d", g_count);
        ROS_INFO("* lost = %d", g_lost);
        g_count = 0;
        g_lost = 0;
}

int main(int argc, char *argv[])
{
        ros::init(argc, argv, "check_cpp");
        ros::NodeHandle hNode;
        ros::Subscriber sub = hNode.subscribe("countup_cpp", 1/* queue_size */, callback);
        ros::Timer timer = hNode.createTimer(ros::Duration(1/* s */), timer_callback);
        ros::spin();
        return 0;
}
#!/usr/bin/env python

import rospy
from std_msgs.msg import Int32

count = 0
has_last = False
last = 0
lost = 0

def callback(message):
    global count, has_last, last, lost
    if has_last:
        lost += (message.data - last - 1)
    last = message.data
    has_last = True
    count += 1

def timer_callback(event):
    global count, lost
    rospy.loginfo('timer callback fired.')
    rospy.loginfo('* count = ' + str(count))
    rospy.loginfo('* lost = ' + str(lost))
    count = 0
    lost = 0

if __name__ == '__main__':
    rospy.init_node('check_py')
    sub = rospy.Subscriber('countup_py', Int32, callback)
    timer = rospy.Timer(rospy.Duration(1), timer_callback)
    rospy.spin()
私の環境だとC/C++は順調なら1000Hzで動けて、Pythonだと定常的に動き切れていない。
$ roscore
$ rosrun mysecondpkg count & rosrun mysecondpkg check # C/C++

《...snip...》

[ INFO] [1547872757.254545370]: timer callback fiered.
[ INFO] [1547872757.254754952]: * count = 1000
[ INFO] [1547872757.254942451]: * lost = 0
[ INFO] [1547872758.253921933]: timer callback fiered.
[ INFO] [1547872758.254190421]: * count = 999
[ INFO] [1547872758.254337868]: * lost = 0
[ INFO] [1547872759.253863079]: timer callback fiered.
[ INFO] [1547872759.254087713]: * count = 1000
[ INFO] [1547872759.254236931]: * lost = 0
[ INFO] [1547872760.253628604]: timer callback fiered.
[ INFO] [1547872760.253839332]: * count = 1000
[ INFO] [1547872760.253986519]: * lost = 0
[ INFO] [1547872761.254522823]: timer callback fiered.
[ INFO] [1547872761.254732770]: * count = 1001
[ INFO] [1547872761.254870686]: * lost = 0
[ INFO] [1547872762.254656373]: timer callback fiered.
[ INFO] [1547872762.254863299]: * count = 1000
[ INFO] [1547872762.255146891]: * lost = 0

《...snip...》
$ rosrun mysecondpkg count.py & rosrun mysecondpkg check.py # Python

《...snip...》

[INFO] [1547873153.015723]: timer callback fired.
[INFO] [1547873153.018780]: * count = 992
[INFO] [1547873153.022183]: * lost = 4
[INFO] [1547873154.015249]: timer callback fired.
[INFO] [1547873154.017115]: * count = 995
[INFO] [1547873154.018809]: * lost = 0
[INFO] [1547873155.015760]: timer callback fired.
[INFO] [1547873155.019039]: * count = 996
[INFO] [1547873155.022590]: * lost = 0
[INFO] [1547873156.015763]: timer callback fired.
[INFO] [1547873156.019143]: * count = 993
[INFO] [1547873156.021569]: * lost = 1
[INFO] [1547873157.015342]: timer callback fired.
[INFO] [1547873157.017199]: * count = 989
[INFO] [1547873157.019246]: * lost = 6
[INFO] [1547873158.015716]: timer callback fired.
[INFO] [1547873158.018833]: * count = 994
[INFO] [1547873158.022501]: * lost = 1

《...snip...》
RaspbianにROSをインストール
2019.1.20 永井 忠一
Raspbianのインストール
公式 から入手。インストールと設定は簡単。情報も豊富。
(NOOBS_v3_0_0.zipを使わせていただきました。)
設定変更
(必要なら)「$ sudo raspi-config」で設定を変更。
「Interfacing Options」→「SSH」
「Boot Options」→「Desktop / CLI」→「Console」
「Advanced Options」→「Overscan」
GUIをオフにした場合、GUIが必要になったら「$ startx」コマンドで立ち上げる。
オーバースキャンは、PCモニターに繋いでいる場合には不要。オフ。
ROSのインストール
公式 を参考にしながら自分でビルドしてインストールする。
Raspbian(Debian)のバージョンStretchとJessieとで違うところがあるので、Webの記述に従う。
バージョンの確認。
$ lsb_release -a
No LSB modules are available.
Distributor ID: Raspbian
Description:    Raspbian GNU/Linux 9.6 (stretch)
Release:        9.6
Codename:       stretch
Webにある手順どおりにコマンドを実行していく。
$ sudo sh -c 'echo "deb http://packages.ros.org/ros/ubuntu $(lsb_release -sc) main" > /etc/apt/sources.list.d/ros-latest.list'
$ sudo apt install dirmngr
$ sudo apt-key adv --keyserver hkp://ha.pool.sks-keyservers.net:80 --recv-key 421C365BD9FF1F717815A3895523BAEEB01FA116
$ sudo apt update
$ sudo apt upgrade
$ sudo apt install -y python-rosdep python-rosinstall-generator python-wstool python-rosinstall build-essential cmake
$ sudo rosdep init
$ rosdep update
$ mkdir -p ~/ros_catkin_ws
$ cd ~/ros_catkin_ws
ROS-CommとDesktopが用意されている。ROS-Commが推奨されているが、ここではDesktopを選択。
$ rosinstall_generator desktop --rosdistro kinetic --deps --wet-only --tar > kinetic-desktop-wet.rosinstall
$ wstool init src kinetic-desktop-wet.rosinstall
続けて。
$ cd ~/ros_catkin_ws
$ rosdep install -y --from-paths src --ignore-src --rosdistro kinetic -r --os=debian:stretch
《しばらく時間がかかる…》
ビルドでメモリ不足
Webに注意が書いているとおり、Raspberry Pi 3 Model BやModel B+の主記憶1GiBではビルド中メモリが枯渇してしまう。GUI環境を立ち上げないなどしても足りない。
最初のうちは順調にパラレルmakeできているが…
  PID USER      PR  NI    VIRT    RES    SHR S  %CPU %MEM     TIME+ COMMAND
19259 root      20   0   97032  81676  13508 R 100.0  8.6   0:10.75 cc1plus
19263 root      20   0   94256  81324  12632 R 100.0  8.6   0:10.13 cc1plus
19261 root      20   0   97920  85632  16332 R  93.3  9.0   0:10.43 cc1plus
19260 root      20   0  100116  84984  12672 R  92.0  9.0   0:10.18 cc1plus
しばらくすると止まってしまう。
  PID USER      PR  NI    VIRT    RES    SHR S  %CPU %MEM     TIME+ COMMAND
   44 root      20   0       0      0      0 S  39.2  0.0   1:03.68 kswapd0
   68 root      20   0       0      0      0 R   9.4  0.0   0:42.20 mmcqd/0
 1794 root      20   0  510460 439932    532 D   4.6 46.3   4:55.20 cc1plus
 1795 root      20   0  508264 437900    172 D   4.6 46.1   4:56.30 cc1plus
スラッシングしている。
そのため、4個あるCPUを活用できなくなるが、同時に立ち上げるジョブの数を1に制限して(-j1オプション)ビルドを実行。
$ sudo ./src/catkin/bin/catkin_make_isolated --install -DCMAKE_BUILD_TYPE=Release --install-space /opt/ros/kinetic -j1
topコマンドで眺めていると、ひとつのプロセスでシステムの半分以上のメモリを使っていることもある。
  PID USER      PR  NI    VIRT    RES    SHR S  %CPU %MEM     TIME+ COMMAND
 4101 root      20   0  632176 616524  16936 R 100.0 64.9   9:48.39 cc1plus
ビルド中…
(フルビルドに10時間程度かかる。)しばらく放置。
《ものすごく時間がかかる………》
ビルドが終わったら、最後に。
$ source /opt/ros/kinetic/setup.bash
$ echo "source /opt/ros/kinetic/setup.bash" >> ~/.bashrc
確認
roscoreが正常に動けばインストールは成功。
$ roscore
... logging to /home/pi/.ros/log/73aa111e-1c56-11e9-96d1-b827eb8fb127/roslaunch-raspberrypi-20916.log
Checking log directory for disk usage. This may take awhile.
Press Ctrl-C to interrupt
Done checking log file disk usage. Usage is <1GB.

started roslaunch server http://raspberrypi:42091/
ros_comm version 1.12.14


SUMMARY
========

PARAMETERS
 * /rosdistro: kinetic
 * /rosversion: 1.12.14

NODES

auto-starting new master
process[master]: started with pid [20926]
ROS_MASTER_URI=http://raspberrypi:11311/

setting /run_id to 73aa111e-1c56-11e9-96d1-b827eb8fb127
process[rosout-1]: started with pid [20939]
started core service [/rosout]
$ rostopic list
/rosout
/rosout_agg
追加パッケージ
joystick_driversやcv_cameraなどを使うため。
$ cd ~/ros_catkin_ws
$ rosinstall_generator ros_comm ros_control joystick_drivers cv_camera --rosdistro kinetic --deps --wet-only --tar > kinetic-custom_ros.rosinstall
$ wstool merge -t src kinetic-custom_ros.rosinstall
$ wstool update -t src
$ rosdep install --from-paths src --ignore-src --rosdistro kinetic -y -r --os=debian:stretch
$ sudo ./src/catkin/bin/catkin_make_isolated --install -DCMAKE_BUILD_TYPE=Release --install-space /opt/ros/kinetic -j1
《すごく時間がかかる…》
GPIOの利用
2019.1.21 永井 忠一
「/sys/class/gpio/」を使う
(何故かUbuntuだとうまく動かず。)Raspbianを使用。
$ sudo echo 24 > /sys/class/gpio/export
-bash: /sys/class/gpio/export: Permission denied
$ ls -l export
--w------- 1 root root 4096 Jan  1  1970 export
用意するもの
ポートのlow/high観測用のLED。
電流制限抵抗は適当に。470Ωとか330Ωとか。
動作確認
まずシェルから使ってみる。
使うポートを指定。ここではGPIO24を使用。
$ echo 24 > /sys/class/gpio/export
$ ls -d /sys/class/gpio/*24
/sys/class/gpio/gpio24
$ ls /sys/class/gpio/gpio24
active_low  device  direction  edge  power  subsystem  uevent  value
入出力の設定。ポートを出力に設定。
$ echo out > /sys/class/gpio/gpio24/direction
ポートをhighにする。
$ echo 1 > /sys/class/gpio/gpio24/value
ポートをlowにする。
$ echo 0 > /sys/class/gpio/gpio24/value
ポートを使い終わったら後片付け。
$ echo 24 > /sys/class/gpio/unexport
同様にPythonから使ってみる。
$ ipython
Python 2.7.13 (default, Sep 26 2018, 18:42:22)
Type "copyright", "credits" or "license" for more information.

IPython 5.1.0 -- An enhanced Interactive Python.
?         -> Introduction and overview of IPython's features.
%quickref -> Quick reference.
help      -> Python's own help system.
object?   -> Details about 'object', use 'object??' for extra details.

In [1]: import os

In [2]: if os.path.isdir('/sys/class/gpio/gpio24') == False:
   ...:     export = os.open('/sys/class/gpio/export', os.O_WRONLY)
   ...:     os.write(export, '24')
   ...:

In [3]: if os.path.isdir('/sys/class/gpio/gpio24'):
   ...:     direction = os.open('/sys/class/gpio/gpio24/direction', os.O_WRONLY)
   ...:     os.write(direction, 'out')
   ...:

In [4]: value = os.open('/sys/class/gpio/gpio24/value', os.O_WRONLY)

In [5]: os.write(value, '1')
Out[5]: 1

In [6]: os.write(value, '0')
Out[6]: 1

In [7]: unexport = os.open('/sys/class/gpio/unexport', os.O_WRONLY)

In [8]: os.write(unexport, '24')
Out[8]: 2

In [9]: exit
テストプログラムのROS化
作業場所の作成。
$ cd ~/catkin_ws/src/
$ catkin_create_pkg mythirdpkg rospy
$ cd mythirdpkg/
$ mkdir scripts
$ cd scripts
$ touch led.py
$ chmod +x led.py
プログラム。
$ cat led.py
#!/usr/bin/env python

import os, time, rospy

if __name__ == '__main__':
    if os.path.isdir('/sys/class/gpio/gpio24') == False:
        export = os.open('/sys/class/gpio/export', os.O_WRONLY)
        os.write(export, '24')
        time.sleep(1) # adhoc

    if os.path.isdir('/sys/class/gpio/gpio24'):
        direction = os.open('/sys/class/gpio/gpio24/direction', os.O_WRONLY)
        os.write(direction, 'out')

    value = os.open('/sys/class/gpio/gpio24/value', os.O_WRONLY)

    rospy.init_node('led')
    rate = rospy.Rate(2) # Hz
    last = 0
    while not rospy.is_shutdown():
        if last == 0:
            os.write(value, '1')
            last = 1
        else:
            os.write(value, '0')
            last = 0
        rate.sleep()

    unexport = os.open('/sys/class/gpio/unexport', os.O_WRONLY)
    os.write(unexport, '24')
実行。
$ roscore & rosrun mythirdpkg led.py
RaspbianにROSをインストール(再)
2019.1.23 永井 忠一
NOOBSを使わずにインストール
別に用意したUbuntu(PC)からdd。私の環境では、デバイスファイル名は「/dev/sdb」。
$ unzip 2018-11-13-raspbian-stretch.zip
$ sudo dd if=2018-11-13-raspbian-stretch.img of=/dev/sdb
microSDカードからbootして、Raspbianの設定を行う。
ROS再インストール
手順見直しのため。再度、通しで。
$ sudo sh -c 'echo "deb http://packages.ros.org/ros/ubuntu $(lsb_release -sc) main" > /etc/apt/sources.list.d/ros-latest.list'
$ sudo apt install dirmngr
$ sudo apt-key adv --keyserver hkp://ha.pool.sks-keyservers.net:80 --recv-key 421C365BD9FF1F717815A3895523BAEEB01FA116
$ sudo apt update
$ sudo apt upgrade
$ sudo apt install -y python-rosdep python-rosinstall-generator python-wstool python-rosinstall build-essential cmake
$ sudo rosdep init
$ rosdep update
$ mkdir -p ~/ros_catkin_ws
$ cd ~/ros_catkin_ws
Desktopを選択。使うパッケージを追加。
$ rosinstall_generator desktop joystick_drivers cv_camera --rosdistro kinetic --deps --wet-only --tar > kinetic-desktop-wet.rosinstall
続けて。
$ wstool init src kinetic-desktop-wet.rosinstall
$ rosdep install -y --from-paths src --ignore-src --rosdistro kinetic -r --os=debian:stretch
ビルド実行。ビルド時間の目安。
$ time sudo ./src/catkin/bin/catkin_make_isolated --install -DCMAKE_BUILD_TYPE=Release --install-space /opt/ros/kinetic -j1
《...snip...》

real    463m56.718s
user    433m51.332s
sys     25m59.897s
ビルド時間は8時間程度。(Raspberry Pi 3 Model B+と適当な16GBのmicroSDカードを使用。)
ビルド後、最後の設定。
$ source /opt/ros/kinetic/setup.bash
$ echo "source /opt/ros/kinetic/setup.bash" >> ~/.bashrc
確認方法は上記と同じ。
カメラ画像の利用
2019.1.24 永井 忠一
準備と確認
UVCカメラ(USBカメラ)を繋ぐ。デバイスファイルが見えるか確認。
$ ls /dev/video*
/dev/video0
cv_cameraの起動。以下のコマンドを実行。
$ roscore
$ rosrun cv_camera cv_camera_node
トピックの確認。
$ rostopic list
/cv_camera/camera_info
/cv_camera/image_raw
/rosout
/rosout_agg
$ rostopic echo /cv_camera/image_raw
header:
  seq: 201347
  stamp:
    secs: 1548224209
    nsecs: 274972146
  frame_id: "camera"
height: 480
width: 640
encoding: "bgr8"
is_bigendian: 0
step: 1920
data: [14, 14, 14, 13, 《...snip...》
(GUIツールのrqtなども用意されていて使える。)
テストプログラムの作成
連番ファイルにPNMフォーマット(.ppm)で書き出す。
作業場所の作成。
$ cd ~/catkin_ws/src
$ catkin_create_pkg myfourthpkg roscpp image_transport sensor_msgs std_msgs
$ touch myfourthpkg/src/still.cpp
image_transportを使う。以下sensor_msgs/に用意されているメッセージ。Image.hを使用。
$ ls /opt/ros/kinetic/include/sensor_msgs
BatteryState.h      LaserScan.h           SetCameraInfoRequest.h
CameraInfo.h        MagneticField.h       SetCameraInfoResponse.h
ChannelFloat32.h    MultiDOFJointState.h  Temperature.h
CompressedImage.h   MultiEchoLaserScan.h  TimeReference.h
FluidPressure.h     NavSatFix.h           distortion_models.h
Illuminance.h       NavSatStatus.h        fill_image.h
Image.h             PointCloud.h          image_encodings.h
Imu.h               PointCloud2.h         impl
JointState.h        PointField.h          point_cloud2_iterator.h
Joy.h               Range.h               point_cloud_conversion.h
JoyFeedback.h       RegionOfInterest.h    point_field_conversion.h
JoyFeedbackArray.h  RelativeHumidity.h
LaserEcho.h         SetCameraInfo.h
CMakeLists.txtに追加。
$ cat ~/catkin_ws/src/myfourthpkg/CMakeLists.txt
《...snip...》

## Declare a C++ executable
## With catkin_make all packages are built within a single CMake context
## The recommended prefix ensures that target names across packages don't collide
# add_executable(${PROJECT_NAME}_node src/myfourthpkg_node.cpp)
add_executable(still src/still.cpp)

《...snip...》

## Specify libraries to link a library or executable target against
# target_link_libraries(${PROJECT_NAME}_node
#   ${catkin_LIBRARIES}
# )
target_link_libraries(still ${catkin_LIBRARIES})

《...snip...》
テストプログラム。
$ cat ~/catkin_ws/src/myfourthpkg/src/still.cpp
#include <stdio.h>
#include <stdint.h>
#include <ros/ros.h>
#include <image_transport/image_transport.h>
#include <sensor_msgs/Image.h>

static void callback(const sensor_msgs::ImageConstPtr &msg) {
        ROS_INFO("image callback fired. (%d)", msg->header.seq);
#if 0
        ROS_INFO("* %02x %02x %02x %02x ...", msg->data[0], msg->data[1], msg->data[2], msg->data[3]);
#endif
#if 1
        { // save image
                static int count = 0;
                static char filename[FILENAME_MAX] = "";
                sprintf(filename, "%04d.ppm", count);
                count = (count + 1) % 1000;
                FILE *fp = fopen(filename, "w");
                if (fp) {
                        fprintf(fp, "P3\n");
                        fprintf(fp, "%d %d\n", msg->width, msg->height);
                        fprintf(fp, "255\n");
                        for (int v = 0; v < msg->height; v++) {
                                for (int h = 0; h < msg->width; h++) {
                                        const uint8_t b = msg->data[(3 * v * msg->width) + (3 * h) + 0];
                                        const uint8_t g = msg->data[(3 * v * msg->width) + (3 * h) + 1];
                                        const uint8_t r = msg->data[(3 * v * msg->width) + (3 * h) + 2];
                                        fprintf(fp, "%u %u %u\n", r, g, b);
                                }
                        }
                        fclose(fp), fp = NULL;
                }
        }
#endif
}

int main(int argc, char *argv[])
{
        ros::init(argc, argv, "still");
        ros::NodeHandle hNode;
        image_transport::ImageTransport it(hNode);
        image_transport::Subscriber sub = it.subscribe("/cv_camera/image_raw", 1, callback);
        ros::spin();
        return 0;
}
コンパイルして実行。
$ cd ~/catkin_ws
$ catkin_make
$ rosrun myfourthpkg still
実行結果
動画で。
VIDEO
© 2018 Tadakazu Nagai